Create Telemetry Credentials (MQTT & REST API)
Plant Telemetry Credentials authenticate edge collectors, gateways, and integration scripts pushing data into OTCognix over MQTT or the REST Ingestion API.
Choose Your Publishing Method Carefully
MQTT can only be enabled when creating a credential and cannot be added later to a REST-only key. Additionally, the generated password or API secret is displayed only once at creation time.
Before You Start
- Have a plant created under your company. See Create, Edit, and Delete Plants.
- Decide whether the collector will publish via:
- MQTT: Publishes to assigned topics through the MQTT broker (and also supports REST API ingestion). Requires assigning MQTT topics after creation.
- REST API: Sends telemetry over HTTPS using HTTP Basic Authentication (
API Key+API Secret).
Step 1: Open Telemetry Credentials for Your Plant
- Go to Configuration → Plants.
- Open the target plant's action menu and select Telemetry Credentials.
- Confirm the breadcrumb shows
Plants > <Plant Name> > Telemetry Credentialswith the Plant-level badge. - Click Add Credentials.
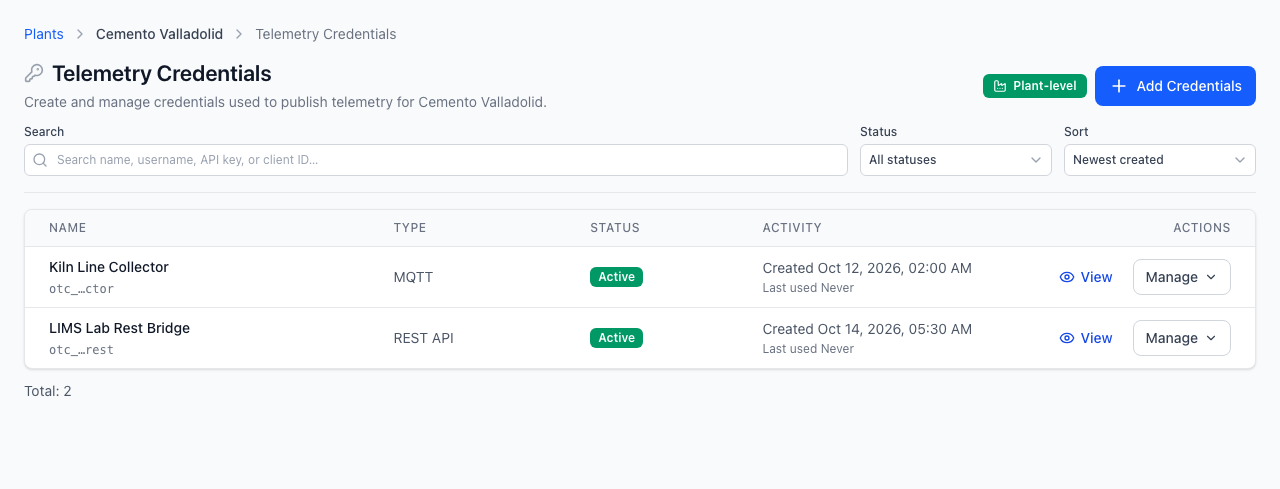
Step 2: Select the Publishing Method
In Step 1 of the Create Telemetry Credentials modal (How will you publish telemetry?):
- Select either MQTT or REST API.
- Click Continue to proceed to credential details.
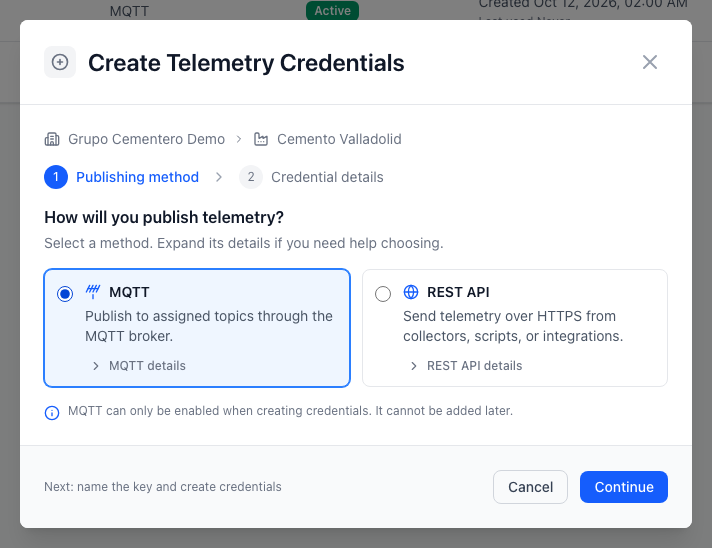
| Option | Protocols Supported | Additional Setup Required |
|---|---|---|
| MQTT | MQTT broker + REST API | Must assign allowed MQTT topics after the credential is created. |
| REST API | HTTPS (POST endpoint) | None — ready immediately with HTTP Basic Auth (API Key / Secret). |
Step 3: Name and Generate the Credential
In Step 2 (Configure MQTT credentials or Configure API credentials):
- Enter a descriptive Name (
1–255characters, for exampleProduction line collector). - Click Create Credentials.
Step 4: Copy and Store One-Time Secrets
Immediately after creation, the MQTT Credentials Created or API Credentials Created modal displays your secret material:
- Use Copy all (or copy each value individually) to store the credentials in your secret manager or collector configuration:
- For MQTT: Username, Password, plus expandable Client ID and plant details (
Client IDandPlant Public ID). - For REST API: API Key, API Secret, plus Plant Public ID.
- For MQTT: Username, Password, plus expandable Client ID and plant details (
- If you created an MQTT credential, click Assign MQTT topics to authorize the topics this collector may publish or subscribe to, then click Done.
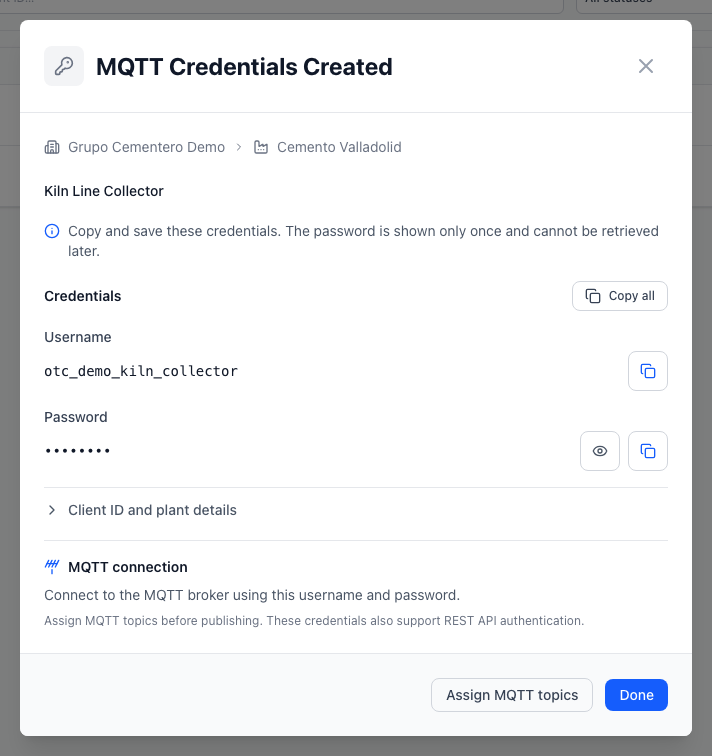
Secret Visibility Rule
Passwords and API secrets cannot be retrieved again after you close the creation modal. If lost, revoke or delete the credential and create a new one.
Step 5: Verify Ingestion
- REST API test: Send a reading to
POST /api/v1/ingest/iot-datausing HTTP Basic Auth with yourAPI Keyas username andAPI Secretas password. See the full payload specification in Telemetry Ingestion API. - Table verification: Refresh Telemetry Credentials to verify the credential shows
Active, its fingerprint, type, creation timestamp, and Last used activity once traffic arrives.
Common Errors & Troubleshooting
| Symptom / Error | Likely Cause | Resolution |
|---|---|---|
| Cannot connect via MQTT with key | Credential was created as REST API or topics unassigned | Create a new MQTT credential and assign topics via Assign MQTT topics. |
401 Unauthorized on ingestion | Incorrect key/secret or revoked/inactive credential | Verify copied secret or issue a fresh credential pair. |
| Add Credentials button missing | Account lacks credential management access on the plant | Request plant telemetry management permission from a Plant/Company Admin. |
| Lost secret after closing modal | Secret is only shown at creation for security | Generate a replacement credential and update your collector. |